Subscriptions are used to export data discoveries and presentations and share them with a distribution list on a scheduled basis.
Once you've saved your data discovery, click the Subscribe icon to open the Subscribe dialog where you can configure a new subscription for the discovery or presentation.
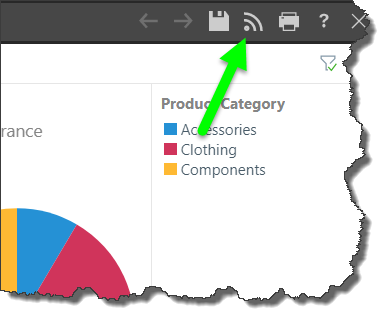
In Discover, the Subscribe button can be found on the right side, above the canvas.
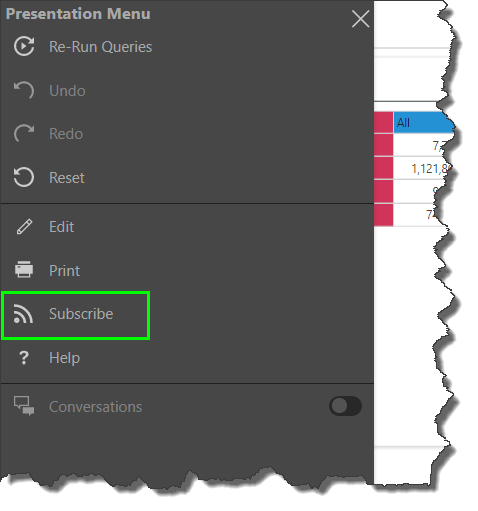
In Present, the Subscribe button can only be found from the Presentation Menu when the presentation is running.
Subscribe Dialog
General
From the General tab, choose the required output type, then set your preferences for the selected output. This tab is the same as the General tab of the Print and Export dialog, with the exception that there is no option to spool the print job because this is not relevant for scheduled subscriptions.
- Click here to learn more about the output selection.

Header/ Footer
The Header/ Footer tab is exposed when configuring subscriptions for data discoveries, and enables you to configure headers and/ or footers. You can incorporate dynamic elements into your headers and footers from the 'Add Element' section.
The Header/ Footer tab is identical to the one in the Print & Export dialog in Discover.
- Click here to learn more about configuring headers and footers.

Details
Set the subscription name and message. This is what will be distributed to you recipients when the schedule job runs.
- Name: by default the subscription is named according to the report title, but this can be changed.
- Message: change the default message as required.
- Run Me: set the schedule from the presets in the dropdown.
- Advanced: click 'Advanced' (yellow highlight below) to open the advanced sheduler.
- Send To: set the destination to which the schedule output message will be distributed. The basic options enable distribution to the Bulletin Board and Email; if the basic distributed is setup, only you (the current user) will receive the subscription output.
- Advanced: click 'Advanced' (green highlight) to open the advanced distribution options, which include phone and Webhooks distribution. Advanced distribution allows you to distribute to others.

Schedule
Set the schedule for the subscription job. The subscription can be run on an hourly, daily, weekly, or monthly basis. You must enter a start date, and you have the option to enter an end date if relevant. If no end date is defined, the job will continue running according to the schedule indefinitely. Select the required timezone from the Timezone drop-down list.
This scheduler works in the same way as the scheduler used for scheduling publications, models, and alerts, with 2 main differences:
- The schedule frequency (i.e. Hourly, Daily, etc) is selected by accessing the relevant tab on the left. The frequency is usually chosen from a dropdown list.
- The subscription scheduler does not offer the option to create a 'one-off' schedule.
- Click here to learn more about configuring the schedule.

Distribution
Users can choose to distribute subscription content to a static list of users, user roles, or emails. Subscriptions may be distributed via four methods:
- Bulletin Board: distribute to a list of users or groups via the Pyramid Bulletin Board.
- Email: distribute to a list of email addresses. You have an option to include a link to the content item.
- Phone: distribute to a list of users via SMS.
- Channel: distribute to a channel Webhook. You have an option to include a link to the content item.
You can distribute the subscription to multiple destinations, but the selected destination(s) must include the Bulletin Board and/ or Email.
This is because phone and channel distribution do not involve sending the subscription output (the actual exported report). The output itself can only be sent via the Bulletin Board or email.
- Click here to learn more about scheduled distribution.

Commit the Schedule
Once you've configured the subscription, click the Subscribe button to save the schedule.